Currently migrating from tengs.fotopic.net to this blog. Please feel free to criticize or comment on my modeling work. Basically I learnt all my modeling skills from modeling forum and by asking people who do modeling. I had started modeling since 2005 but only completed a few kits.... will pick up a proper modeling course when time permits. Right now for this blog, I will only put up the WIP pics for HGUC Z-Gok cause it will be very tedious for me to load up all WIP for other kits. I will just load up the completed part for the archives. Thanks for visiting my blog...
Message from Author
21 Sept 09
Just recover from a month of sleepless night due to (*)!**#!$$*@$. Now back to my normal lifestyle....
05 April 08
Back to normal working days.......Find it hard to maintain my blog with my current progress..... Slowly the level of interest on modeling is depleting.............................. engine stall.....
23 Feb 08
Identity
30 December, 2007
26 December, 2007
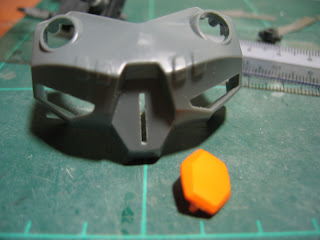
HGUC Z-Gok/WIP/Detailings
--
 - before mod. -

- adding placard with stripe design to simulate vent -


- the shape of the placard come from the side design
of the upper body where the arm is fitted -

- test fit -
Posted by
tengs
at
2:21 AM
0
comments
![]()
![]()
20 December, 2007
HGUC Z-Gok/WIP/LED Installation

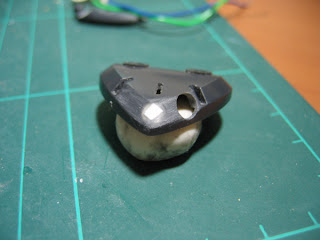
- LED -


 - push button location which is made out of placard
- mod on the orange piece, the placard extension is
secured by very fine brassrod and superglued, a
hole is drilled on the placard so that it can be
secured, see later pic -

actually acts as a pivot for the push button -


- Messy setup for the wiring, luckily there are all hidden -
- LED Testing -
- Mod done and ready for testing -
- Short clip on mod testing -
- Mod. on the mono eye position -
- My forum mate (Acguy4ever) had suggested maybe I should reposition the eye by the side to give it a fiercer look. Indeed it look better after the mod -
- Drill a hole by the side and covered the initial
hole by using placard and super glue -

- Mission accomplished! -
Posted by
tengs
at
1:48 AM
1 comments
![]()
![]()
HGUC Z-Gok/WIP/ Torso+Groin Mod.


- before mod, both lower torso and groin are
in one piece -

- lower and groin seperated -
- the most tedious part to work with. Materials
required are placard and additional grey joint.
Simply secured them with superglue. As you have
noticed that I had lengthen the ball joint, see later
pics for explanation-

- the problem with the default design is that when
the legs are installed, the gaps between the legs and
the skirt joints are to near. To avoid scratches, I
shifted the ball joints close to the edge and at the
same time lengthen it to give it more flexibility. Of
course this required sawing of the ball joints and
super glue. Brass rod is installed into the ball joint
to strengthen the holding (sorry no pic. for the brass
rod installing) -

Posted by
tengs
at
1:19 AM
0
comments
![]()
![]()
03 December, 2007
HGUC Z-Gok/WIP/Shoulder Mod. Part II
- the work behind this mod. require to chisel off 2
gaps to install the 0.75mm thick placard firmly on
each side. Super glue is used to enhance the bonding -
 - broaden the shoulder to avoid scratches when
- concept of securing the other side of the rod
to the shoulder ball joint -


- test fitting -
Posted by
tengs
at
6:42 PM
1 comments
![]()
![]()
02 December, 2007
HGUC Z-Gok/WIP/ Shoulder Mod. Part I
--

- Internal Skeleton -


- Remove excess portion of the shoulder area,
shaded in black -

Posted by
tengs
at
6:39 PM
0
comments
![]()
![]()


