
Currently migrating from tengs.fotopic.net to this blog. Please feel free to criticize or comment on my modeling work. Basically I learnt all my modeling skills from modeling forum and by asking people who do modeling. I had started modeling since 2005 but only completed a few kits.... will pick up a proper modeling course when time permits. Right now for this blog, I will only put up the WIP pics for HGUC Z-Gok cause it will be very tedious for me to load up all WIP for other kits. I will just load up the completed part for the archives. Thanks for visiting my blog...
Identity
30 December, 2007
26 December, 2007
HGUC Z-Gok/WIP/Detailings
- Detailings -
- Detailing for arm vents and shoulder gaps -
--
--
 - before mod. -
--
- after mod. -
--

- adding placard with stripe design to simulate vent -


- filling up the claws gaps with glue and used placard,
changing the look of the claws-

- the shape of the placard come from the side design
of the upper body where the arm is fitted -

- securing the placards with 3 springs -

- test fit -
20 December, 2007
HGUC Z-Gok/WIP/LED Installation
- LED installation, Push Button Concept -
--
LED installing......my favourite part....for this portion there are a few areas that you need to take note. Implementing the 2 "S" : Size and Space....You need a "LED" of the size shown below and a push button that is small enough for you to accomplish what you intend.
--

- LED -
 - glue the LED on the mono eye -
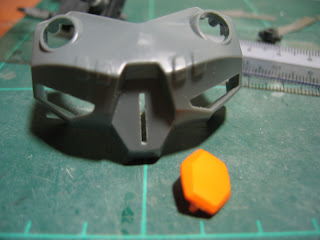
- the orange piece act as the push button -
--

- push button -
 - push button location which is made out of placard
and brass rod -

- mod on the orange piece, the placard extension is
secured by very fine brassrod and superglued, a
hole is drilled on the placard so that it can be
secured, see later pic -
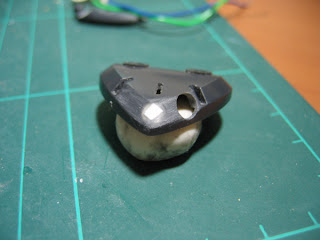
 - the orange piece is secured by the brass rod, it
actually acts as a pivot for the push button -
 - push button secured with super glue -
 - cut out a plastic sheet from the CPU Fan box to make
 a battery compartment -
--

--

- Messy setup for the wiring, luckily there are all hidden -

- LED Testing -

- Mod done and ready for testing -
- Short clip on mod testing -
- Mod. on the mono eye position -
- My forum mate (Acguy4ever) had suggested maybe I should reposition the eye by the side to give it a fiercer look. Indeed it look better after the mod -
- Drill a hole by the side and covered the initial
hole by using placard and super glue -

- Mission accomplished! -
HGUC Z-Gok/WIP/ Torso+Groin Mod.
- Torso+Groin Area Mod. -
--
- The idea of this mod is to give this kit a better pose, tedious mod as a lot of filing and chiseling are required especially on the groin joint which connect the upper body to the lower body -

- removing the excess part shaded in black to
avoid scratching of the lower torso when moving -
--

- before mod, both lower torso and groin are
in one piece -

- lower and groin seperated -

- the most tedious part to work with. Materials
required are placard and additional grey joint.
Simply secured them with superglue. As you have
noticed that I had lengthen the ball joint, see later
pics for explanation-

- the problem with the default design is that when
the legs are installed, the gaps between the legs and
the skirt joints are to near. To avoid scratches, I
shifted the ball joints close to the edge and at the
same time lengthen it to give it more flexibility. Of
course this required sawing of the ball joints and
super glue. Brass rod is installed into the ball joint
to strengthen the holding (sorry no pic. for the brass
rod installing) -
 - after mod. and test fitting. Mod consider done -
03 December, 2007
HGUC Z-Gok/WIP/Shoulder Mod. Part II
- Shoulder Mod. Part II -
--
- Remove arm ball joints from both shoulder area. My intention is to increase the shoulder length so that I can created a better flexibility for the shoulder movement, the overall presentation appear to be rather weird as the arm and body are to space out, need something to cover up the space.... thanks to forum big boss ( Maxwinamp) for his suggestion, will consider his ideas but meanwhile I will leave this mod aside to do other mod -

- the work behind this mod. require to chisel off 2
gaps to install the 0.75mm thick placard firmly on
each side. Super glue is used to enhance the bonding -
 - broaden the shoulder to avoid scratches when
 moving the arms -
--

- concept of securing the other side of the rod
to the shoulder ball joint -
 - rod secured! -


- test fitting -
02 December, 2007
HGUC Z-Gok/WIP/ Shoulder Mod. Part I
I am not very good at planning, always do mod. in an adhoc basis in the way that what come in my mind first will be output from my hand after. Of course this is not a very good practice.
- Shoulder Mod. Part I -
--
--
- The first mod. that strike me is to make these arms move better -
--

- Internal Skeleton -
 - ball joint removed for further mod -

- Remove excess portion of the shoulder area,
shaded in black -
 - before and after removal -
24 July, 2007
1/100 [NG] Zaku Warrior - Gunner Ver
1/100 NG Zaku Warrior - Gunner Ver
[Duration: 18 Jun 06 ~ 24 Jul 07]
--
- Due to my part-time study, had to leave this kit untouch for close to a year. A few mod done on this kit as well, this time round the LED installation is better. Mod on the thigh section so that it can have a better pose. First time using wire mesh for modeling....didnt appear to be very nice for this mod. Refer to this link for more WIPs : http://plamo.outthere.info/forum/showthread.php?tid=812 -
--


28 March, 2007
1/100 [MG] Dom [Completed]
- 1/100 MG Dom -
[Duration: 17 Feb 07 ~ 28 Mar 07]
--
- First time taking part in forum competition, the rules are simple, just do it OOB.....can remove plastic but cannot add plastic...that simple....didnt win anything but really enjoy the competition meetup. This is also the first MG kit I am doing. Scribed a ZEON Logo, removed some plastic from the rear side of the leg to simulate vent. For this kit, the painting seem to be a big problem....I am not too sure is it because I used tamiya putty as primer usage that cause the irregularity of the painting.....haiz so much to learn... and yes pls visit this link for my WIPs: http://plamo.outthere.info/forum/showthread.php?tid=1914 -
--


Subscribe to:
Posts (Atom)